Alan Close demonstration 19th
March 2016
Travel Sketches & Portraits
Unfortunately our listed demonstrator, Malcolm Webster, was sick, but we were able to call on a very competent replacement, our president and tutor, Alan Close. He very generously gave us a double demo, travel sketches and portrait. In each case it was accompanied by a very informative handout, full of valuable teaching points.
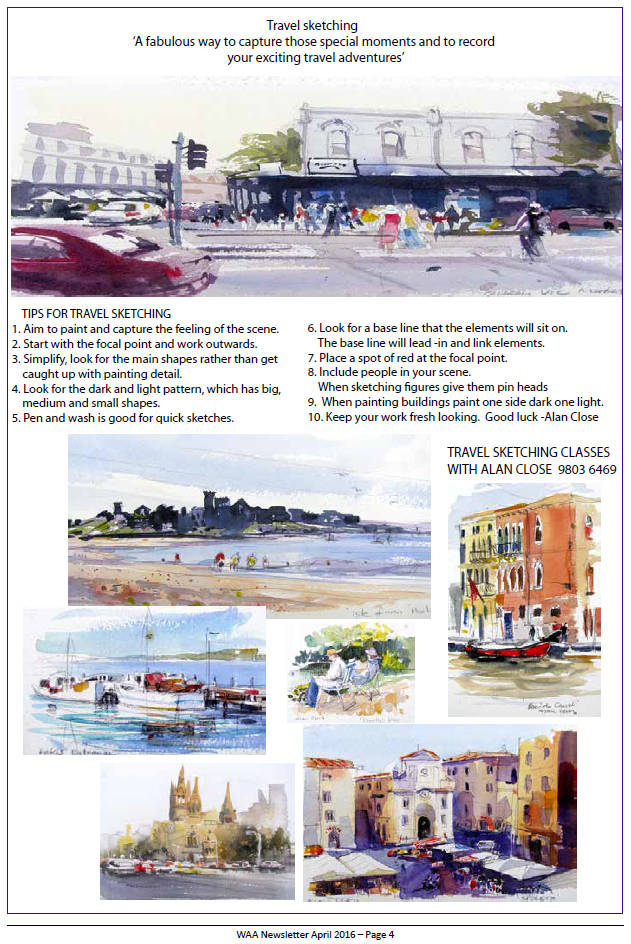
Travel sketching
 With half shut eyes identify the
light and dark areas, and the warms and cools. Simplify. Do a shaded
tonal sketch, maybe in pencil on spare paper. Decide on your focal
point (FP). Then for your final sketch, work on good quality Arches watercolour paper folded and torn to A4 size giving a nice decal edge.
Put it on a clipboard. Using a black biro, and keeping the point on
the paper in a continuous confident movement, no second, third or
fourth goes at a line, sketch in your scene. Start at the FP and leave
space around the edges as it tends to grow as you go. I noticed that
Alan held the pen not as for handwriting but with the back of his hand
on top of the pen and with a full shaft. This is to avoid getting too
tight. Looseness is the thing at this stage.
With half shut eyes identify the
light and dark areas, and the warms and cools. Simplify. Do a shaded
tonal sketch, maybe in pencil on spare paper. Decide on your focal
point (FP). Then for your final sketch, work on good quality Arches watercolour paper folded and torn to A4 size giving a nice decal edge.
Put it on a clipboard. Using a black biro, and keeping the point on
the paper in a continuous confident movement, no second, third or
fourth goes at a line, sketch in your scene. Start at the FP and leave
space around the edges as it tends to grow as you go. I noticed that
Alan held the pen not as for handwriting but with the back of his hand
on top of the pen and with a full shaft. This is to avoid getting too
tight. Looseness is the thing at this stage.
Alan had a photo to go by,
but you should try to do it ‘en plein air’. It was a mountain gully
with distant blue ranges, midrange red cliffs and a grassy, rocky
foreground. Some overhanging trees. As Nick said, good depth. The FP
was where it all converged so that was where Alan wanted his darkest
darks to edge with his lightest lights.
The lines in, he began to
paint. The brushes were a normal filbert, a square end, a rigger and
later a bristly fan. No expensive palettes, just a $2.50 melanite plate
which is easy to clean. Cobalt Blue for the sky, darker at the top.
Mauve for the far ranges, wet in wet to purple as they came closer. The
purple was an important element in the overall painting. It became the
strongest dark at the FP, and later was used as a glaze to knock back
the red/orange. It was Dioxin Violet. He also mixed in a bit of
Paynes Grey if he wanted to darken a colour.
 The cliffs were painted in
with a strong orange, which looked too vivid at this point, but Alan,
experienced artist, knew that when he knocked it back with a purple
glaze it would be just right. He used a bit of dry brush for sparkle
edges and left some bits out for tree trunks and branches. You don’t
want to lose your whites at this stage. The square brush was useful.
Then he did the ground in Yellow Ochre, getting browner as it came
closer. He had a light touch holding the brush long, dancing across the
wispy grass. The tops of rocks were left light, the sides purple.
Then he was into the greens of the foliage. He used a Sap Green with
yellow for the tops and, while wet, Australian Green Leaf (olive)
with a touch of Paynes Grey into the lower parts for shade. The
brush was used on its side to scumble the foliage. To tie it all
together he mixed a light glaze of purple and shaded most of the
orange. He hit the FP with dark purple so it contrasted with its light
edges. Using the rigger he brought out the tree trunks and branches and
some straggly grasses, and it was all done. Great work.
The cliffs were painted in
with a strong orange, which looked too vivid at this point, but Alan,
experienced artist, knew that when he knocked it back with a purple
glaze it would be just right. He used a bit of dry brush for sparkle
edges and left some bits out for tree trunks and branches. You don’t
want to lose your whites at this stage. The square brush was useful.
Then he did the ground in Yellow Ochre, getting browner as it came
closer. He had a light touch holding the brush long, dancing across the
wispy grass. The tops of rocks were left light, the sides purple.
Then he was into the greens of the foliage. He used a Sap Green with
yellow for the tops and, while wet, Australian Green Leaf (olive)
with a touch of Paynes Grey into the lower parts for shade. The
brush was used on its side to scumble the foliage. To tie it all
together he mixed a light glaze of purple and shaded most of the
orange. He hit the FP with dark purple so it contrasted with its light
edges. Using the rigger he brought out the tree trunks and branches and
some straggly grasses, and it was all done. Great work.
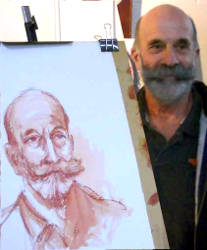 After a lovely
spread of afternoon tea Graeme Jones sat for a portrait. Alan’s handout
of Six Secrets contained excellent teaching points. He had only 25
minutes so it could be only a sketch and there was a lot of risk of
not getting it right. However he achieved a really good likeness in
that short time. Using only a watercolour pencil (Albrecht Durer
Cadmium Red Mid) and a wet brush he produced a strong monochrome of
Graeme’s moustached face.
After a lovely
spread of afternoon tea Graeme Jones sat for a portrait. Alan’s handout
of Six Secrets contained excellent teaching points. He had only 25
minutes so it could be only a sketch and there was a lot of risk of
not getting it right. However he achieved a really good likeness in
that short time. Using only a watercolour pencil (Albrecht Durer
Cadmium Red Mid) and a wet brush he produced a strong monochrome of
Graeme’s moustached face.
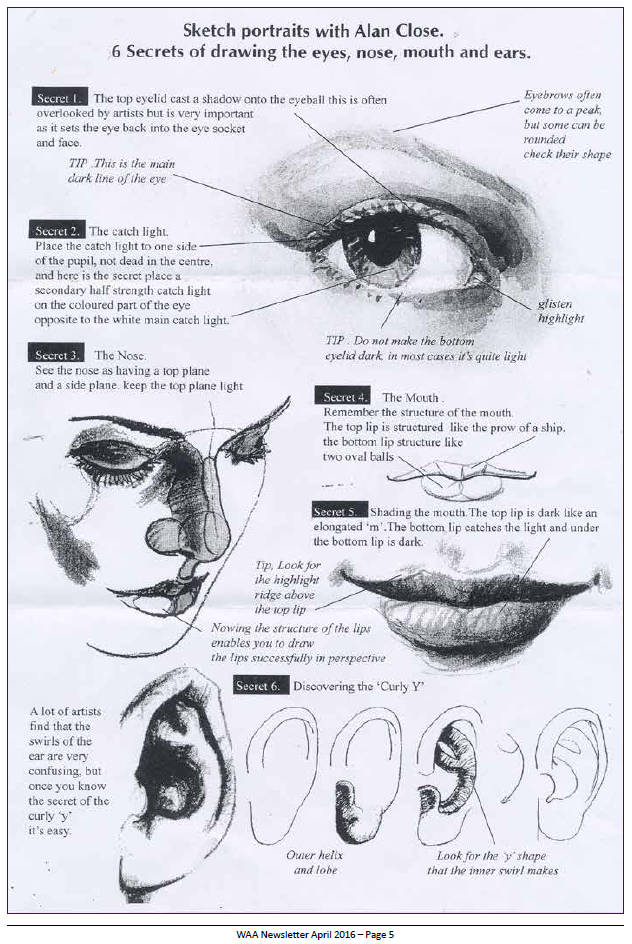
How do you do it? Start with a light line
for the angle of the eyes. Draw one eye, referring to the notes about
how to draw eyes. There is a wealth of wisdom in those notes. At a
distance of one eye apart draw the second. How long is the nose?
Eyes and nose tip make a triangle. Check the angles and that
will help you get it right. How high is the forehead? Get the
lower half of the face done then measure from eye to chin, mark
that distance above the eyes and there you have the top of the
forehead. The ears can be marked top and bottom across from the eyes
and mouth. He showed a trick to get the curly inside of the ear right.
We were being shown secrets from Alan’s years of experience. Thank you.
Very generous.
So far it has been dry pencil. Now he scrubs the pencil
hard on to a bit of card, takes a wet brush and wets the red to get a
wash which he uses to shade the appropriate areas of the face. He has
already gone hard in the drawing where he knows it will be shaded, so
he just has to wet and spread those lines to get nice gradated soft
edges. It was like a magic paint brush. 26 minutes. Fantastic demo
Alan.
Report by Colin Browne